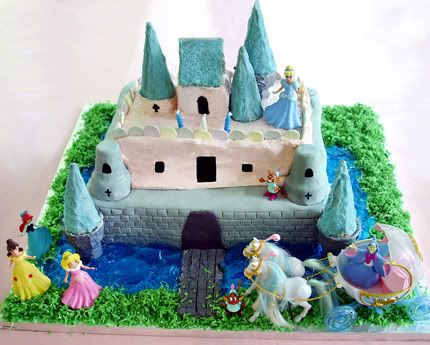
 For Luci's party we did princess cake. The inspiration for this cake is the Disneyland Castle (Sleeping Beauty Castle). Being an avid watcher of Cake Boss & Ace of Cakes, Karl and I thought we had this. We would work together as a team and bang this out in one day. Throwing around terms like "dirty ice", "crumb coat", and "gum paste" so easily without having worked with fondant or even taken one cake class, is classic K&J style. (Keep in mind, this is the same man, who said he could dye my hair because he watched the E channel. With a barbeque basteing brush in one hand, reynolds wrap in the other- he got to work and I emerged 45 minutes later with bright orange hair.) Confidence is a good thing; sometime too much of it makes you look foolish. And I did not want this cake to be a disaster. Up until 3 in the morning, the whole kitchen covered in powdered sugar, we somehow managed to pull this off. And I will list a short tutorial in case you would like to try. (You could switch it up to suit your needs....ie.. knights castle w/ dragons for boys...etc.)
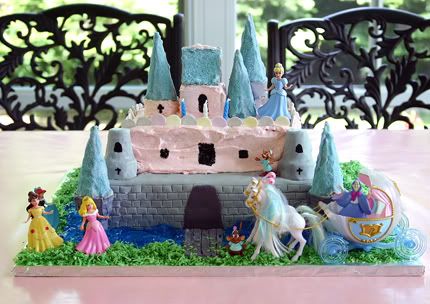
Here's what you will need:
2 boxes of cake mix
1 container of frosting or filling
graham crackers (about 6)
1 pkg icecream cones
1 pkg sugar cones
1 pkg blue jello
1 pkg coconut
food coloring ( green, blue, red and black)
fondant (I made marshmallow fondant found here and doubled the recipe)
2-3 cups of sugar
buttercream frosting (here's the easiest recipe you will need 3-4 batches)
1. Determine the size of your cake and find a board or something large enough to put it on. (We used a shelf found in the garage). Make sure it is clean and cover in foil.
2. Make blue jello. Let cool in fridge.
3. Start by making the rice krispie treat base. (to get the depth we wanted we used a large plastic tub) Depending on how big you want it, you can use a 13x9 pan and stack a few next to or on top of each other.
4. Once your base is cool you can "dirty ice" it. This is spreading a thin layer of buttercream frosting over it. This will smooth it out and help the fondant adhere.
5. Now make the fondant, following the recipe carefully. Add food coloring. Roll it out and drape over the cake.
6. Smooth the fondant. Then make brick lines with a knife or toothpick. With the leftover fondant we made the shape of the arch and adhered it to the front.
7. Make your cakes a little smaller than your base. Once completely cooled assemble and fill with frosting or filling. (I did red velvet with cream cheese filling). I recommend a denser cake though, such as pound cake.
8. Frost your cake with the colored buttercream frosting (or if you really had fun w/the fondant you could use that).
9. For the top part make a little graham cracker square with roof. Stick it together with lots of frosting.
10. For the castle turrets, use icecream cones rightside up or upside down. Frost w/buttercream or fondant.
11. Mix the sugar with blue food coloring until you get it the right shade. Frost sugar cones w/ buttercream and roll in the sugar mixture. (you could also use edible glitter, sprinkles or pre colored sugar- I just did what I had on hand).
12. Once the turrets are all assembled to your liking, make the drawbridge out of graham crackers, ice it, then score with a knife.
13. We used the black food coloring (in a pot) to paint onto cake for windows and crosses.
14. If desired add any candy to the top of castle.
15. About an hour or two before the party spoon jello around the castle for the water.
16. Add food coloring to the coconut. Sprinkle the "grass" around the water. ( I got this idea from here. ) You could also use oreo or chocolate cake crumbs for dirt.
17. Next, top with candles and your favorite characters to create "the scene". And ENJOY!!!
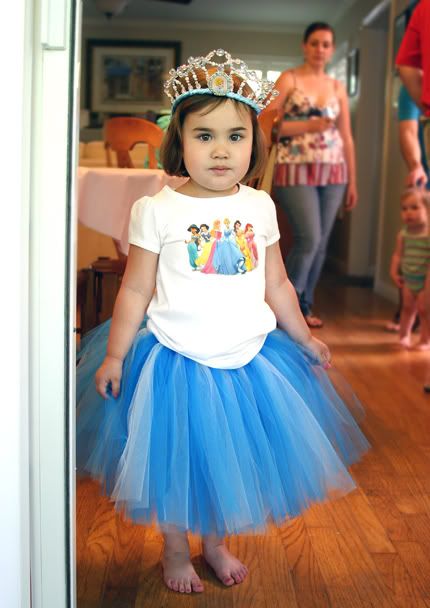
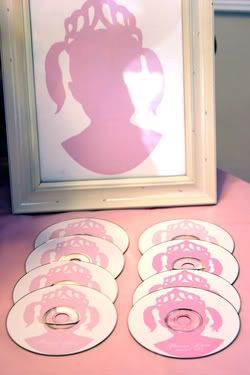
Here's a pic of the princess on her big day. She loves all the princesses but she loves Cinderella just a little bit more. It makes me sad that now that she's three "Rella" is now "Cinderella" and "No White" is "Snow White". At least Sleeping Beauty is still "Booty". The pic below is our party favors. We made a Cd for guests to take titled "Princess Luci's Party Mix" with classic stuff like "Girls Just Wanna Have Fun" some Disney stuff, remix princess songs and fun indie girly music. For the framed print and the cd labels I used Luci's silhouette.
disney princess cake tutorial, disney princess birthday party, disney princess party favors


Wow, great cake. She looks so sweet.
May 19, 2010 at 5:13 AM
Too cute!!
Love the cake!
May 19, 2010 at 12:00 PM
love what you did with the favors for the kids, very cute!
June 6, 2010 at 4:46 PM